See menu above for other pages in this section.
“What cable size should I use?”
Here is a very useful article and cable size calculator courtesey of 12 Volt Planet, who also happen to supply very resonably priced auto and marine electrics!
Cable Size Information and Calculator
Keep the Bilge Dry
Every boat collects water down in the keel channel, and it can get a bit smelly if left. You can pump it out but there will always be dribbles either from tiny leaks or from condensation under the floor, even if it is theoretically sealed. With an inboard engine you get the added delight of spilt or leaked engine fluids. You can buy marine absorbent pads which are good but expensive. You can get car mechanics absorbent pads which are also good and cheaper. Cheaper still, and certainly good enough in my opinion, are value brand baby nappies from a supermarket. I bought a big pack from Tesco for £1.50. Here’s what you do. They come out of the packet looking like A, which is no use as they are designed to fit round a tiny bum not lay flat in a bilge. With scissors trim off the side elastic so you have a flat pad as in B. Then simply lay it in the bilge, absorbent side down. You will be amazed how much water it literally sucks up. Be careful how you remove it as rough treatment will cause it to split and the gel beads will fall out. Also, keep the nappy away from bilge pump intakes to avoid blockage. I take mine out before trips just to be sure.

DIY Bailer
Bailers are handy for lots of things, in addition to scooping water out of the boat. (They are particularly handy for peeing into when a strong wind makes the usual method unpredictable!) Although they only cost a few quid, you can make one for free.
- Firstly obtain a strong, clean plastic container of the sort used for lubricants and other chemicals. (Remember to keep the cap!)
- Make a cut at an angle from below the handle to the far corner. A band-saw makes this job very easy, but a hand saw or even a sharp knife will do.
- Voila, the finished article. It really is that simple. It also serves as a funnel if you take the cap off.

Softening Ropes
After a while, ropes can become stiff and difficult to handle – probably due to salt drying in the fibres. To give rope a new lease of life, soak it overnight in a bucket of water to which you have added a cup of fabric conditioner. Rinse the rope out in the morning – it will be softer, but not as soft as it was when new. Better than it was, though.
Splash-proof Electrical Junction Box
This box can be used to protect individual connectors, fuses, bus-bars, connection blocks or anything else for that matter. All you need is a plastic food-saver type box with a lid that seals. These are available in a variety of sizes from supermarkets and home stores. First, mount the box by screwing the base to a bulkhead. Seal under the screw heads with Sikaflex or silicone. Drill cable entry holes in the side, thread cables in and seal with grommets or more silicone. Connect your connectors, or fix your connector block, and snap the lid on. Job done, a nice waterproof house for your electrics for not much money. You can also mount a larger one (without any cable holes) to hold keys, watch, mobile phone etc. A suitable plastic lunch box would have a hinged lid – even better. Just don’t get a Barbie one.
Trailer Modifications
There are two modifications worth making to your trailer. The first is to fit two vertical metal rods sticking up above the trailer wheel axle, wide enough to clear the sides of the boat and high enough to see above water when you are guiding the boat onto the trailer. If you can, make these rods sturdy enough so they can hold the boat aligned correctly above the trailer once the boat is between them. This saves a lot of trouble when you have a difficult cross-wind or current to contend with.
The second is to fit a sturdy flat board to your trailer draw-bar using galvanised U-bolts, so you can walk along the trailer from the shore to the boat, to make adjustments or connect the winch hook. This is much easier than stumbling through the water, potentially tripping over bits of submerged trailer. Cover the top of the board with some form of non-slip surface so you are less likely to fall off it. I said less likely. Remember to pack a towel.
Mooring Ropes
Splice or tie a loop at one end of each mooring warp, and make the size of the loop fairly generous. This makes it much easier to slip the line over a bollard and quickly get a secure point ashore when you are coming alongside. You can concentrate on tidying up your mooring once you are connected with dry land. Large loops can slip off however, so if you are using it to tie up for any length of time, use the loop to create a noose, or if the mooring point ashore is a cleat with a hole in the middle, run the line through the hole first then loop back over the cleat.
Battery Troubleshooting
Batteries have a hard life on a boat as they are not used as regularly as most car batteries, and when they are used, they are subjected to deep drain when starting an engine. If your battery fails to start the engine, it may have been drained as a result of unexpected use while the boat was left, or it could just be a failing battery.
To check whether there is a load on the battery even though you think everything is switched off, disconnect the positive terminal and connect a multi-meter between the terminal and the cable. If there is a current flowing, something must be draining the battery and you need to track down the culprit. If you do not have a multi-meter (these are very useful and cost less than £10 from B&Q or Screwfix), use a festoon bulb instead. A festoon bulb is the type of bulb with a metal connector at each end, and are used in car interior lights and navigation lights. If the filament glows even slightly, there is a current drain, and you need to find it. There may be a short circuit or short to ground somewhere, or there may be a device left switched on.
If you suspect the battery may be faulty, firstly visually inspect for obvious problems, such as damaged cases, corroded terminals or cables, loose terminals or low electrolyte. If all appears OK, then you will need to check the voltage.
If you have just recharged your battery, then a phenomenon known as “surface charge” will cause the battery voltage to be higher than normal. To ensure accurate readings, you must eliminate any surface charge before testing. Use one of the following methods:
Allow the battery to sit for six hours with no load or charger connected
Apply a 25 amp load for three minutes and wait five minutes
With a battery load tester, apply a 150 amp load for 10-15 seconds
The battery under test must be disconnected from any load or charger when testing. This is referred to as “Open Circuit”. To determine the battery’s state-of-charge using a multi-meter, the following readings will indicate the level of charge
12.70 – 100%
12.45 – 75%
12.24 – 50%
12.06 – 25%
11.89 – 0%
If the state-of-charge is below 75% the battery needs to be recharged before proceeding.
Replace the battery, if one or more of the following conditions occur:
- If the battery will not recharge to a 75% or more state-of-charge level
- If digital voltmeter connected to the battery terminals indicates 0 volts, you have an open cell
- If the digital voltmeter indicates 10.45 to 10.65 volts you have a shorted cell. (A shorted cell is caused by plates touching or sediment build-up between plates).
Battery and Alternator Voltages
Do you worry about whether your alternator is working properly and the condition of your battery? Here are a few things to check. You need a mutlimeter or at least a voltmeter.
A good battery at rest should read higher than 12.6volts.
With the alternator running, the battery voltage should be 14.2 to 14.7volts.
Under load, the voltage should not drop below 13volts.
If your system reads any different, get specilaist help!
12 Volt Doctor’s Electrical Handbook – Free Download
This is a great book as a reference for 12 volt electrics in boats. The free download is here: www.melody-in-blues.org/downloads/electrical_12volthandbook.pdf
Alternatively you can buy the latest version from Amazon.
Vicron Marine Electrics Book
Vicron supply some great electrical management kit, I have several items of theirs on my boat. They have recently published and distributed a free 12 volt reference book. It is extremely comprehensive and bang up to date as well.
Free Download : 43562-Wiring_Unlimited-pdf-en from Vicron Energy
VHF Aerial Connectors
Many VHF problems can be traced to a faulty or corroded connector attaching the aerial cable to the back of the unit. Unfortunately all VHF radios are fitted with a SO259 socket so you can only use a PL259 to connect up your ariel. They are a large plug to connect and being a screw fitting they tend to vibrate loose on a boat. To make a secure connection, strip back 20mm of the outer insulation and tease the braid of your cable back. Strip back 15mm of the insulation from the centre conductor, flux it and tin with solder. This is important as this will help prevent the corrosion problems.
Feed the centre cable into the centre pin of the PL259 and screw the cable into the shell of the plug. This provides a grip on the cable and connects the shell to the braid of the cable. Solder the centre tinned cable to the centre pin. Trim the tag end and you will have a secure connection between plug and cable. (Thanks to ChrisP from World Sea Fishing)
More Electrical Tips
- Which wire to use? Insulated copper wire is fine, but the problems start when the copper is exposed to make a connection. Dip the exposed copper into Silicone grease or Vaseline (Silicone grease has a slightly higher flash point but not as easy to source) and 4mm of the insulation prior to crimping the connector to the end. As you crimp you should get the grease/Vaseline squidging out of the crimp, this provides a good seal to the bare wire.
- Where you have to run a positive and negative wire anywhere near your compass twist the wires, this negates the magnetic field they create and minimises the effect on the compass.
The power to your VHF should be direct from the battery and fused separately as close to the battery as you can. This stops interference getting into or out of the set. - Connections: buy a proper ratchet crimping tool and insulated crimps. These are available from good tool suppliers like www.screwfix.com
- There is a crimp available that incorporates a heat shrink tube. These are very good but expensive. Alternatively you can use the normal crimps with a length of heat shrink added, there is a dual wall tube available which has a normal outer and an inner of hot melt glue which provides a mechanical and waterproof joint when heated.
- Battery Switches: if you use a battery switch ensure it is the type that maintains a contact whilst switching (apart from the off position obviously). There are some that don’t and if the engine is running whilst it is switched off it can cause damage to the charging circuit.
- Lighting: for a deck light, buy a cheap car reversing light or even two. Fit one with a 5 watt bulb and one with a 20+ watt. Put them on separate switches and you have the 5watt for background light and the 20 watt for baiting, tackling up, landing fish etc. Put a smear of Vaseline over the internals of the light and it will last just as long as the purpose made marine variety but cost less than a tenth of the price.
- For a cabin light a small 12 volt fluorescent (cheaper from camping shops) is good, it provides shadow free lighting and doesn’t use a lot of power.
All these tips came from the late ChrisP of WSF, a mine of knowledge. Thank you my friend.
Adding a Fishfinder Transducer
The following text is taken from the DIY chapter in my book “Angling Boats”. For an alternative version with a protective box see here.
A fish-finder works by sending pulses through the water and measuring the time and strength of the return signal. The unit that sends these signals is the transducer, which must be mounted either in the water or on the inside face of a fibreglass hull, with no air space or bubbles between the face of the transducer and the water. The transducer must be mounted where the face of the transducer is on a horizontal plane, where no turbulence and bubbles in the water will pass in front of it. All of this will be described in detail in the fish-finder installation manual.
The position giving the best signal will be a transom mount, using the brackets supplied. If you chose to do this, make sure you use marine-grade screws, and a caulk sealant designed for underwater use. Route the cable up the transom to a point well above the waterline before drilling a hole and threading the cable through. The cable will have a connector for the unit already fitted, so you will have to drill a hole large enough to accommodate the connector. This will be larger than the hole required for the wire, so fill the gap with caulk sealant and cover the outside with a plate designed for the purpose – if one was not supplied with the fish-finder, they can be obtained from the larger yacht chandlers.
Alternatively, you can mount the transducer inside the hull, but only if you can find a suitable position. The transducer must be in a safe place where it will not be damaged by your fishing activities, where it can be mounted flat, and where it will shoot through solid fibreglass without the signal being obstructed by foam cores, wooden stringers or external turbulence. The mounting will require permanent fixing so you will need to test it before committing to a position, because if you fit it in the wrong place it will be very difficult to move. To create a trial mounting, make a “pond” of water where you want to mount the transducer, using a quantity of modelling clay such as Plasticene for the walls of the pond, just large enough to accommodate the transducer. Place the transducer in the pond, and the water will fill the gap between the transducer face and the hull, allowing the signal to pass through. Ask a willing crew member to hold it in place while you test the signal in the water, both at rest and under way, or if the crew proves unwilling or unreliable, make a sandbag by filling a strong plastic bag with damp sand and wedge the transducer in place with that.
One you have decided on the position for the transducer, clean away the Plasticene and water, and thoroughly de-grease the inner hull surface and transducer face. There are two alternative means of fixing the transducer face to the inside of the hull – you can use epoxy adhesive such as Araldite, PU adhesive or silicone sealant. In either case, use a generous quantity to make sure there are no gaps or air bubbles under the face of the transducer. If you are mixing adhesive, do it carefully so there are no air bubbles. Place a large blob of adhesive on the inner hull and press the transducer face down onto the blob, pushing down and making sure the transducer face is well seated in the adhesive. Wedge the transducer in place until it sets.
Non-Slip Decks
You can buy non-slip deck material and stick it on your decks in strips or patches, but the stuff costs money and tends to lift off after a few years. There is a much cheaper alternative if you have painted deck surfaces. Mask off the areas you want to make non-slip, and prepare as you would normally do for painting. Put on a layer of marine paint and as soon as it is on and while it is still very wet, sprinkle with fine dry sand giving an even covering. When the paint is dry, brush off the loose sand and put another coat of paint on top.
This will make the most effective non-slip surface you can get, but be careful with exposed skin because if you fall on it, it will skin you. A kinder alternative but not so hardwearing is to use sugar or salt instead of sand, and put on one coat of paint only. When the paint is very hard, wash the surface down with water to dissolve the sugar or salt, leaving a rough surface behind.
Seagull Scarer
A suggestion from Howard: Our boat is kept on a swinging mooring in Bembridge Harbour and it soon became apparent that the seagulls liked to use it as a dining table and toilet. I tried a flag fluttering off the radio aerial and then the stuffed owl all to no avail so came up with this rather crude but very effective way of putting them off. The centre piece is an old cycle pedal. The bar is a broom handle and the cups are the plastic ball used in a toilet system cut in half. The cord is elastic and the hooks are stainless from a chandlers. This spins round in even light winds and puts the gulls off from landing. I have been using it for the past 10 years as can been seen from the state of them as I have made up two, one for the front and one for the top of the cabin.

Wiper Saver
More from Howard: The small blue pieces of pipe under the wiper blade arms lift the blades off the glass when the boat is not being used which helps to stop that horrid scraping noise you get when the blades are left in the one position for too long between trips.

Boat Notices
Another from Howard: I kept leaving the boat on the mooring to find that I had not done something or had left something on board and therefore had to row out again to sort it out. All it is is a check list that is laminated and displayed in the cabin to go through before leaving the boat.

Another sign is left on the boat inside a window, facing out. This makes it easy to contact the owner if there is a problem.

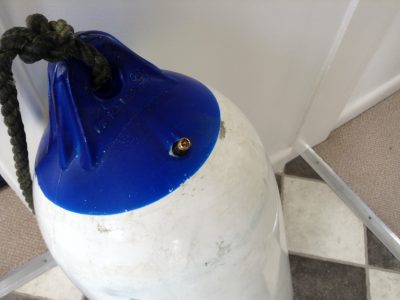
Re-life Your Fenders
Another tip from Howard Allen of “Manx Maid”, Bembridge.
When one of my boat fenders ceases to fend due to deflation and a broken valve I drill out the old valve, then replace it with one of the valves that I get from a tyre fitting garage. Make sure you get the whole valve that they have cut off when they replace tyres including the inner valve core. Trim off the excess rubber and then glue the valve into the drilled out hole. When set it is now easy to re inflate the fender using a foot or hand pump. Saves having to buy a new fender.
Gyotaku Fish Prints
I came across this technique by accident in an art fair in California. Any angler trailing around after family on holiday will be immediately drawn to something fishy. I saw a stand, I think it was Fish Sarasota, and their prints were fabulous. Later, I found out more about the technique. Apparently it was developed by competitive sea anglers in Japan, long before photography was invented. They wanted a method of proving a size of fish when they returned (nothing changes, then). Presumably their trips were lengthy and before the days of refrigeration anyway.
They would smear the fish with ink and press paper on the fish, and a life-size imprint was made for posterity. That is all there is to it! The effects range from crude to dramatic art, have a look at the examples from Fish Sarasota (note the prices!). You can have a go yourself – here’s how. You will need:
- A fish (preferably with good fin and scale definition, like bass and bream)
- Tubes of water-based ink in various colours – blue, green and black, plus red and yellow for highlights
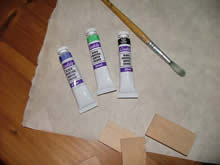
- Paper – Chinese rice paper or a soft handmade paper
- Paintbrushes
- Pins
- Small scraps of wood
- Patience
The art materials can be bought very cheaply from a good art shop. As Farnham has an art college there is a very good one in the High Street. The fish needs to be fresh and in good condition. Smaller ones are easier to start with. Clean the slime off, and dry with kitchen paper. Carefully open the fins, and pin them in a live position – this is where the scraps of wood come in handy. Let the fish dry for 30 minutes or so. Remove the pins and the fins should stay in position.
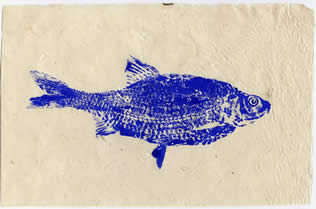
Now select the colours – you can either follow the actual fishy colours, or do something funky. If you search for gyotaku on the web you will find a lot of examples. Paint the fish all over with ink, including fins, but DON’T PAINT THE EYE. Now take your piece of paper, lay it on the fish and without twisting or smudging, press gently all over so the fish is imprinted on the paper. Gently peel the paper off, and set aside to dry. If you have messed it up, paint the fish again and have another go with a clean piece of paper. When the print is dry, paint in the eye leaving the centre empty, and leave a spot to represent a shiny eye. If some parts have been missed, you can repair the print very carefully with a fine brush and very little ink. Have a look at examples on the web, there are lots of good ideas to copy – you can even make a shoal out of multiple prints of a single fish. The example here is a simple print of a roach that had an accident – it’s easier to work on small fish first.
If your fish was fresh and was not left lying around in a hot room, it will still be edible. Wash the ink off, and nobody will know. Waste not, want not! There is a YouTube video here.