I came across this technique by accident in an art fair in California. Any angler trailing around after family on holiday will be immediately drawn to something fishy. I saw a stand, I think it was Fish Sarasota, and their prints were fabulous. Later, I found out more about the technique. Apparently it was developed by competitive sea anglers in Japan, long before photography was invented. They wanted a method of proving a size of fish when they returned (nothing changes, then). Presumably their trips were lengthy and before the days of refrigeration anyway.
They would smear the fish with ink and press paper on the fish, and a life-size imprint was made for posterity. That is all there is to it! The effects range from crude to dramatic art, have a look at the examples from Fish Sarasota (note the prices!). You can have a go yourself – here’s how. You will need:
- A fish (preferably with good fin and scale definition, like bass and bream)
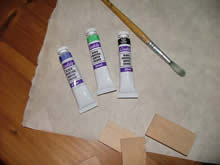
- Tubes of water-based ink in various colours – blue, green and black, plus red and yellow for highlights
- Paper – Chinese rice paper or a soft handmade paper
- Paintbrushes
- Pins
- Small scraps of wood
- Patience
The art materials can be bought very cheaply from a good art shop. As Farnham has an art college there is a very good one in the High Street. The fish needs to be fresh and in good condition. Smaller ones are easier to start with. Clean the slime off, and dry with kitchen paper. Carefully open the fins, and pin them in a live position – this is where the scraps of wood come in handy. Let the fish dry for 30 minutes or so. Remove the pins and the fins should stay in position.
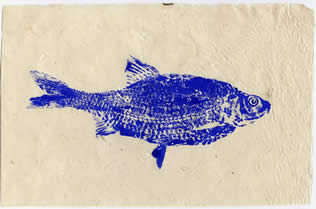
Now select the colours – you can either follow the actual fishy colours, or do something funky. If you search for gyotaku on the web you will find a lot of examples. Paint the fish all over with ink, including fins, but DON’T PAINT THE EYE. Now take your piece of paper, lay it on the fish and without twisting or smudging, press gently all over so the fish is imprinted on the paper. Gently peel the paper off, and set aside to dry. If you have messed it up, paint the fish again and have another go with a clean piece of paper. When the print is dry, paint in the eye leaving the centre empty, and leave a spot to represent a shiny eye. If some parts have been missed, you can repair the print very carefully with a fine brush and very little ink. Have a look at examples on the web, there are lots of good ideas to copy – you can even make a shoal out of multiple prints of a single fish. The example here is a simple print of a roach that had an accident – it’s easier to work on small fish first.
If your fish was fresh and was not left lying around in a hot room, it will still be edible. Wash the ink off, and nobody will know. Waste not, want not!